Showing posts with label recipe. Show all posts

Wednesday, September 9, 2026

Vegan Applesauce Cake with Brown Sugar Streusel Topping

This post contains affiliate links. I may receive a small commission if you click a link and make a purchase, but never at any additional cost to you.

I had way too much applesauce in the house - so I decided to get creative and make something that would work for Rosh Hashana!

I settled on cake and my daughter requested muffins, so I made a cake (22 cm X 32 cm pan) plus 12 muffins. (The cake pan I used is a convenient size, and I really need a new muffin pan - the one I have is close to 30 years old and it has scratches in the coating so I don't want to use it anymore)

Here's what I did:

1 1/2 cups applesauce (I used UNSWEETENED)

1 green apple, chopped (I was too lazy to peel it)

1 3/4 cups sugar

2 tsp cinnamon

1/2 cup oil

^^Mix these together in a mixing bowl


Add:

4 cups 80% whole spelt flour

1 tsp salt

1 1/2 tsp baking soda

^^Use a spatula to gently mix these together, just to start combining them


Add:

1 7/8 cups water

1 tablespoon apple cider vinegar

^^Use a wooden spoon or a wire whisk and mix well.

Grease and flour 2 baking pans (or line with parchment paper) or 1 pan and a standard muffin tin

Divide the batter among the pans.

Now we have to make the topping:

In a clean bowl, combine:

1 cup (whole spelt) flour

1 cup brown sugar

2.5 tablespoons of neutral oil

^^Mix this with a fork or spoon (I grabbed a spoon) till crumbly. Sprinkle over the tops of the cakes/muffins


Bake at 175 C (with the turbo/hot air setting on) until your toothpick test comes out dry (about 50 minutes for cake and 30 minutes for muffins)


ENJOY!

Wishing all of you a Shana Tovah!


Wednesday, February 11, 2026

Recipe: Vegan pancakes

This post contains affiliate links. If you click on a link and make a purchase, I may receive a small commission, at no additional cost to you


Vegan Pancakes!


I decided to make some pancakes today, and as usual, I wanted to keep it simple, so I went with the method that would make the fewest dirty dishes - vegan pancakes! They came out great, and they're really easy, so I wanted to share!

Recipe
(makes enough for 4 normal people, so if teenage boys are around, adjust accordingly!)

1 cup whole grain or other flour (I used 80% spelt)
2 tablespoons sugar (I used demarrara but you can use any)
1 tablespoon baking powder
½ teaspoon salt
1 cup vanilla soy milk (but you can use any kind)
1 tablespoon apple cider vinegar (for those of you wondering, yes, you can use regular "white" vinegar for this instead. Just please don't use balsamic or other wine-based vinegar)

First place all the dry ingredients in a mixing bowl, and mix with a fork or spoon. Then make a well in the middle of the dry ingredients and pour the soy milk and the vinegar into the well. Let it sit for 2-3 minutes, then mix well with the fork or spoon.
Let the mixture rest for about 5 minutes before you start frying up your pancakes.

Fry them up on a lightly oiled frying pan (I like my cast iron pan for this), and enjoy!

I added blueberries to the batter this time - they were great! You can add in anything you want, or just go traditional with this and serve with maple syrup (but the price of that went through the roof lately, so we'll understand if you decide to find a substitute for maple syrup!)

These were a late night dinner for us, but obviously they make the perfect breakfast if you're up for cooking in the morning!

Enjoy!

P.S. the links in this post only work if you're in Israel - sorry. If you want to buy a great mixing bowl or a cast iron pan outside of Israel, check the links down here:


Wednesday, May 28, 2025

Recipe - Homemade BBQ Sauce

 This post contains affiliate links. If you click on a link and make a purchase, I may receive a small commission, at no additional cost to you.

You've probably stumbled across this blog post because you're trying to save money, or because you love Israel, and I'm so glad you're here - welcome!

Here we are, in late May of 2025, and I can't possibly be the only one noticing those grocery bills creeping higher, right?

It seems like each week I have to adjust my expectations - item after item, prices are going up, and I adjust my shopping. And I'll be honest, I don't want to spend every moment of my day doing food prep, but I also don't want to spend more than I've budgeted, and I don't want to have to give up too much to stick to the budget! It's a tough spot to be in.

So while I've always made some things from scratch, I have begun to make a few more things from scratch.

This week, I made a large batch of chummus with a high percentage of techina, and stashed a lot of it in my freezer packaged in convenient portions for single-meal use. And you know what? I really don't think I'm going back to supermarket chummus - this homemade stuff is so much better (and healthier!), and the hardest part is remembering to put some chickpeas up to soak the night before. 😆

But this post isn't about chummus, it's about another favorite that I have stopped buying: BBQ Sauce. The supermarket options that are affordable have ingredients I don't actually want to eat, and we didn't love the way they taste, either. So I decided to make my own.

Using tomato paste, brown sugar, maple syrup, spices, and vinegar - I think it came out good!

Here's what I did:

Take out a mixing bowl and silicone spatula. Put the following in the bowl:

240g of tomato paste (this is the larger tub option in the supermarket, not a big can)

half a cup of water

1/4 cup dark brown sugar

1/4 cup apple cider vinegar

2 teaspoons maple syrup, but you can use honey if you prefer

2 teaspoons smoked paprika

1/2 teaspoon coarsely ground black pepper

1.5 teaspoons granulated garlic

pinch of salt (or more!), to taste

hot pepper flakes and/or smoked hot pepper, to taste

All amounts are approximate, and can be adjusted!

Mix well. If you're using this as a marinade before cooking, you don't even need to heat it up before using it. If you want to serve it as a sauce at the table, I recommend heating it in a pot on the stove until it's been heated all the way through. Don't use a high flame, it will bubble and make a mess! You can throw in a pinch of baking soda when warming it if you want to reduce the acid a bit.

Use a silicone spatula to help scrape it out of the pot into a jar or bowl for serving or storage.

Enjoy!

If you want to find (and share!) shopping deals, please join my deals groups on Facebook: 
I'm also on WhatsApp with an opt-in group where you'll get links to deals I find. Only admins can post.

Wednesday, November 13, 2024

Very simple chocolate yeast cake (vegan)

It's baking shortcut time!
Who loves chocolate yeast cakes (think: Chocolate Babka and the like)?!

Well, we're big fans of them around here, but sometimes I have no time or patience for kneading and rising. 

That's where this super simple, cheater version of a chocolate yeast cake comes in!
It's so easy and I even avoid making dirty bowls -  I just mix it AND bake it in a baking pan!


Recipe:

1 3/4 cups flour (I used white spelt)
1 Tablespoon dry yeast
4 Tablespoons sugar
pinch of salt
2.5 Tablespoons oil (I used sunflower oil)
3/4 cup warm water
Your favorite chocolate spread (small jar - I use anywhere from 1/2 - a full jar, depending what I have in my pantry)
1/3 -1/2 bag chocolate chips/chocolate chunks
oil for the pan

What you do:
Oil a 9 inch round baking pan or something that holds a similar amount (there are medium size - long but narrowish, not as narrow as "English cake" disposable foil pans - that work) - I used sunflower oil spray.

Place flour, yeast, sugar, and salt into the pan and mix. Make a well in the middle and add water and oil. Mix everything together with a spoon until well combined - it will be a very sticky dough. Spread it out in the pan. Scoop chocolate spread on top of the dough and then use a spatula or spoon to swirl it into the dough. Sprinkle the top with chocolate chips.

Put the cake into a cold oven and then turn the oven to 175 C. Bake for about 30 minutes. Cool for at least 10 minutes before cutting it!

Enjoy with coffee and please let me know if you try it out. I love to hear from you!

If you want to find shopping deals, please join my deals groups on Facebook (Kosher Frugal is a public group with limited moderation, Live in Israel, Shop Online is a moderated group, and Israel Deals Made Easy (in English) is also moderated) and WhatsApp (the WhatsApp group is an opt-in group where you'll get links to deals I find. Only admins can post).

Sunday, April 14, 2024

Chocolate Cake (Vegan)

this post contains afflilate links. If you click on a link and make a purchase, I may receive a small commission, at no additional cost to you!


My go-to cake lately is chocolate cake. And it's a super simple recipe. (And more often than not, one of my kids makes it.) And it always gets compliments. AND it's vegan!

So since several people asked about it, I'm posting it here. 

The thing about this recipe is it's deep chocolate flavor. REAL dutched cocoa is the secret. If possible, don't use any other kind. And certainly don't substitute with that weird powder Israelis call chocolate for baking. It will be all wrong, so just don't, ok? Thanks!

Vegan Chocolate Cake

This recipe makes 2 cakes - 9 inch round or 8 inch square both work. Actually, this week I made it in my 8.5 inch bread pans and it was extra moist and delicious!

3 cups flour (I used 80% whole spelt, but really any flour should work)
2/3 cups dutched cocoa powder (I get it in the shuk in Teverya, I'm sure you can find it other places too. If you live near me, you can join our group orders from the store that carries them! Be in touch!)
2 cups sugar
0.5 tsp salt
1.5 tsp baking soda

MIX all the above together in a mixing bowl. Make a well in the center.

Add:
1/3 cup oil (I use sunflower oil, but use whatever you prefer)
1 cup cold coffee (plain, unsweetened, no milk, nothing whatsover added!)
1 cup cold water
3 tablespoons apple cider vinegar

MIX everything together until well combined. Pour batter into lined or greased and floured pans.

Optional, but highly recommended: 1/2 bag or more of chocolate chips - sprinkled on top!

Bake at 190C for about 35 minutes (test with a toothpick before declaring them done). Cool before cutting.


Enjoy! Let me know what you think!


Monday, March 25, 2024

5-minute supper!


Tonight, I wanted soup. But I didn't want to spend time in the kitchen, obviously. (That's what extreme burnout does to me...)

So I took stock of what I had on hand and it hit me: with just 5 minutes of work, we can have tomato soup with rice and croutons!


Here's what I did:

Tomato Soup with Rice

1-1.5 cups leftover cooked brown rice
1 large can crushed tomatoes
Water - the amount that fits in the empty can
1/2 tsp. dried onion flakes
1/2 tsp. dried garlic flakes
1/2 tsp salt
a pinch of hot pepper flakes
a couple dashes of coarsely ground black pepper

Mix it all together in a pot and heat on the stove until heated all the way through.
Serve with croutons.

Quick croutons

Several pieces of leftover challah/bread
spray oil
granulated garlic
dash of salt
dash of pepper

Cut the challah/bread into small pieces. Sprinkle salt, garlic, and pepper over the pieces of bread. Spray with oil.
Bake at 220C until golden brown.
Serve with soup or salad.

Enjoy!!

Find more quick meal ideas HERE

Tuesday, December 12, 2023

Recipe: Super fast lentil soup

this post contains affiliate links. If you click on a link and make a purchase, I may receive a small commission, at no additional cost to you.

This lentil soup is so easy, it almost feels like cheating. I literally can put a pot of soup together and it's ready to eat in 20 minutes, maybe less! - without an Instant Cooker (Instapot)!

And it's pretty nutritious and filling, and really inexpensive, too.

The key is to use ONLY shelf-stable pantry staples. No chopping anything, because then there are dishes and you also need more TIME!

red lentils, garlic, dried onions, black pepper, hot paprika
Not shown but also needed: SALT

I know, some people only use fresh onions and garlic, but hey. sometimes you don't want to get garlic on your hands, or make your eyes water from chopping onions! So I keep these dried versions in my pantry, and they're also great timesavers. I buy them in bulk from the spice store in my nearby shuk. (If you live in my area, get in touch with me to join the WhatsApp group for deliveries from the spice store in the Teverya shuk!)

Ingredients:

  • 1.5 cups red lentils
  • 1-2 tablespoons dried fried onions
  • 1-2 tablespoons dried garlic
  • 1/4-1/2 teaspoon hot paprika flakes
  • salt and pepper to taste
  • 2 liters boiling water

Pick over and rinse lentils. Put lentils, dried onions, garlic, and paprika flakes in a medium size pot. Add boiling water. Bring to a rolling boil for 2 minutes, then turn the flame down, and simmer for 10-15 minutes, until the lentils are soft. Add salt and pepper, and mix well. Serve hot.

Croutons of any kind make a great addition (leftover bread makes great croutons)!

I like this soup just the way it is, but I've also been known to add leftover vegetable soup to the pot once the lentils are soft, and turn it into lentil-vegetable soup. Or sometimes I'll toss in some cooked noodles. You can also play with the spice ratios. Nothing here is set in stone -make it your own!

I hope you like this time-saving and very inexpensive soup recipe! Let me know!


Thursday, September 7, 2023

Repost: Overnight Chicken

this post contains affiliate links. I may receive a small commission if you click on a link and make a purchase, at no additional cost to you.

I'm reposting this due to some recent requests for this recipe! I originally posted this several years ago.

Read on for more - I started doing this because sometimes life gets crazy, and I was finding myself exhausted at the end of a long day, needing to sleep, but also really needing to get some food cooked for Shabbat. I hope you like my "cook while you sleep" post!

This post is long, long overdue!

I've been meaning to post about one of my favorite ways to streamline my Shabbat cooking.

Some of you have heard me say that I'm getting some of the cooking out of the way on Thursday night before I go to sleep by prepping "Overnight Chicken". During really busy times, this is a lifesaver!

I know a lot of people really don't like Crock Pot Chicken, but I really love the convenience of prepping food and letting it cook while I sleep. And the thing I love about overnight chicken the way I do it is its forgiving nature. I can leave it in for 8 hours as planned, or if I need to, take it out after 10 hours! It's better than Crock Pot Chicken.

So here's what I do:

I use a nice big roasting pan. I think it's one of the keys to success with this recipe. The other key to success is the baking paper. Read on and I'll explain the method I use. If you don't have a large roasting pan like this, I recommend setting aside some money to buy one. (You can even find a very affordable one - this one ships to Israeli addresses and currently has a FREE shipping option!)

THE BASIC METHOD:
Place cut up chicken in the pan.
*Season the chicken.
Cover with baking paper.
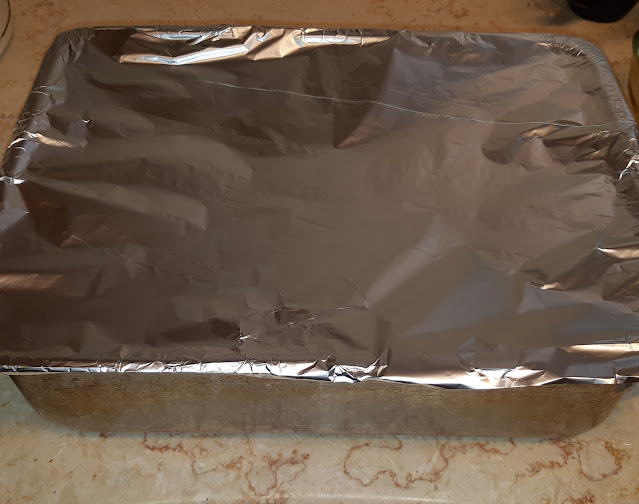
Cover TIGHTLY with aluminum foil.
Place in oven.
Turn oven on 100 C for 8-10 hours.


After it's cooked for 8-10 hours (and most likely the aroma of your Shabbat chicken is driving everyone in the house crazy), take it out of the oven.

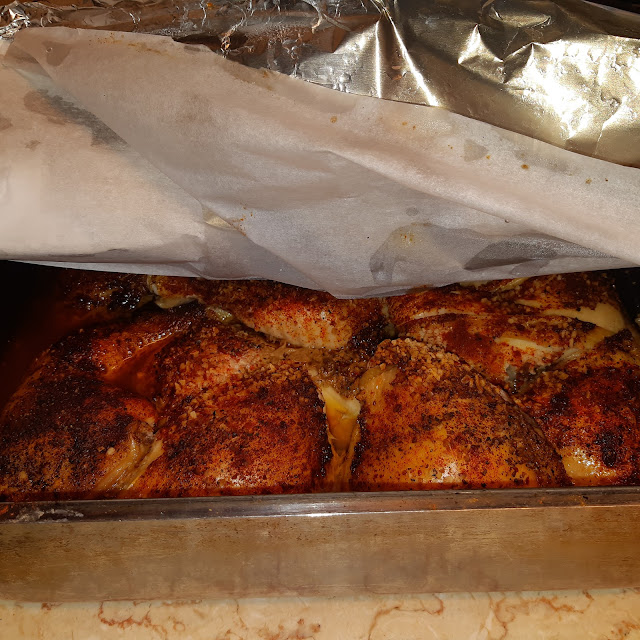
Take a look inside the pan:


(This was 2 chickens, cut up)

*Seasonings:

When I make overnight chicken, I default to one of two flavor profiles. And I'm completely imprecise about it. I just line up my seasonings on the counter and then one by one I shake some out onto the top of all the chicken. Obviously, this means it can vary a bit in flavor from week to week...

Flavor Profile #1: "Spicy Chicken"

For this flavor profile, I use:

Soy Sauce (I use GF soy sauce with no sugar added)
Turmeric
Granulated or Minced Garlic (lots)
Ground Ginger (not a lot)
Black Pepper (coarsely ground)
Smoked Paprika
Hot Pepper (I prefer the Chipotle version of this so it's smoked and hot - you can find it on iHerb - note that this link is my referral link)

You can leave out the soy sauce if you're soy-free, but if you do, it might be worth sprinkling a bit of salt onto the chicken with the other seasonings.

Flavor Profile #2: "Date Honey Chicken"

For this flavor profile, I use:

Granulated or Minced Garlic (don't skimp)
Ground Ginger (don't skimp)
Black Pepper (coarsely ground)
About 1/4 cup silan (Date Honey - I use the kind that is 100% dates)


I don't add salt to this one.

I'm sure you can use the same method for any other flavor profile you like -- I'd love to hear your favorites!

Hope you like this recipe. Please leave me note if you make it, and I'd be thrilled if you tag me on social media if you post about it. Thanks!

Friday, June 16, 2023

VEGAN White Spelt and Oat Bran Challah Recipe


--- Retrieved from http://www.kosherfrugal.com/2013/06/sweet-whole-wheat-and-oat-bran-challah.html -

I change up my challah recipe sometimes, and this is our White Spelt Vegan version! It's been a hit with my family. If you make it, I'd love to hear your feedback!


White Spelt and Oat Bran Vegan Challah

1 kilo white spelt flour, sifted

2/3 cup oat bran
 
1 T. salt  
1/2 cup sugar
2 tsp dry yeast
1/3 cup oil + a little more for oiling the bowl (use the oil you like for baking - I use sunflower oil)
3 1/4 cups warm water*

 *I find that the amount of water needed varies a lot - it depends on the temperature and humidity in my kitchen on a particular day, and different batches of flour behave differently

(Take challah without a bracha for this quantity)

Directions:

1. Mix together dry ingredients (flour, oat bran, salt, sugar, and yeast)
2. Make a well in the center of the dry ingredients and add liquid ingredients. Mix well. Then knead well till you have a nice ball of dough that isn't too sticky to work with.
3. Drizzle about 1-2 teaspoons of oil into the bowl and flip the ball of dough over a couple of times, so it's coated lightly in oil. Cover and allow to rise till doubled. On warm days, this can take about 1 hour.  In the winter I set it up in the morning and forget about it until noon or so.
4. Punch down. Shape your challot. Allow to rise for about 1/2 an hour. (I usually make 3 challot out of this size batch, but it's easily doubled)
5. PREHEAT YOUR OVEN TO 220 C/425 F
6. Optional: brush the tops with a sugar-water mixture or oat "milk"
7. Bake for about 25-30 min at 220C (425 F) until golden.
Allow to cool before you devour them. Lately everyone likes them best when I remember to take them out of the oven at 24-25 minutes so they're just-so-slightly underbaked.

Shabbat Shalom!


Sunday, April 23, 2023

Updated Recipe: Vegetarian Liver

This post contains affiliate links. If you click on a link and make a purchase, I may receive a small commission, always at no additional cost to you!

I'm posting an updated NUT-FREE version of this recipe, because I no longer make it the way it appeared on this blog back in 2014, due to a nut allergy.

I've been making variations of this recipe for years, and it's been a big hit with family and guests.


It IS vegetarian, so I'm sure it does not taste like REAL chopped liver, but I haven't eaten chopped liver in over 3 decades, so what do I know? It's our favorite vegetarian version, though.

I hope you'll try it out and let me know what you think!

Vegetarian Liver

1 cup water
1/2 bag frozen green beans (about 400g)
1/2 bag frozen peas (also about 400g)
olive oil
1 onion, chopped
4 cloves of garlic, chopped
oregano
1 cup toasted sunflower seeds
salt and pepper to taste

Place green beans, peas, and water in a pot. Bring to a boil, reduce heat and simmer for about 20 min.

(watch to be sure you don't boil out the water, add water if needed)

Set aside to cool.

Heat olive oil in a medium size frying pan (I usually use my cast iron pan) and saute onions and garlic with oregano flakes, until caramelized and very fragrant.

Combine peas, green beans, some of the cooking water, onion/garlic mixture, sunflower seeds, salt, and pepper in the bowl of your food processor. Pulse to puree. Add more cooking water or regular water if needed.

(If you don't have a food processor, you might want to consider getting a light duty one for the times you want to make recipes like this! Here's one to take a look at that ships from within Israel (link updated 31.1.2024 so it's valid again!).)

Transfer to a container and refrigerate before serving. Serve with cherry tomatoes, pickles, olives, and crackers!

I'd love to hear what you think of this recipe!

Sunday, January 29, 2023

Versatile Vegan Cake Recipe

This post contains affiliate links. This means that I may receive a small commission if you click on a link and make a purchase, but at no additional cost to you! Thanks for your support!

I love having simple cake recipes I can throw together in just a few minutes! Because let's face it - we're all really busy people who just want to bring yummy food to the table for our families, with minimal fuss and minimal stress, right?

This recipe is so simple, it can be mixed in the pan you're baking it in - just be sure to whisk it well! If you've been using disposable baking pans, I highly recommend this awesome set of 6 stainless steel baking pans (2 of each of 3 sizes)! They even ship (free to Israel (and other locations) with a $49 USD order. (I just bought them for Pesach for myself - for year round I had found a different deal, but this deal is so much better I just had to share!!) I'm trying really hard to use real pans instead of disposables, and lately, I have bought a LOT fewer disposable pans! Less waste and lower expense over the lifetime of a pan! Win-win, as long as I can handle washing a few more dishes. And yes, yes I CAN do that!

(Pictures here are from cakes I made before I bought new cake pans. Sorry)

Here's the cake recipe I've been making almost every week, and it is easy to adapt to different flavors (see notes at the end of the recipe).


My family is always happy to see this cake, as are my guests, and no one knows it only took a few minutes to make!


Vegan Vanilla Cake

1.5 cups flour (I use white spelt or whole spelt flour, but wheat flour should be fine)

1 cup sugar

1 tsp baking soda

1/4 tsp salt

2 tsp vinegar

1.5 tsp vanilla extract

1 cup water

1/4 cup oil

If you want, you can mix this in a bowl and transfer it to a greased or lined pan, OR mix right in the baking pan according to these instructions: 

Use an 8" round cake pan/can also be square or rectangular - it works perfectly in the smallest of the pans in the set mentioned above. Mix together dry ingredients (with a fork) right in your baking pan. Push the dry ingredients toward the outer edges of the pan, pour the wet ingredients into the middle and mix gently but thoroughly (gently so you don't make a mess) - best to use a whisk but you can use a fork. Once it's all combined, smooth it out, add in whatever add-ins you want (use a spatula to gently fold them in) and you're ready to bake the cake!

Bake at 190 C for about 50-60 min.

Variations:

- Leave out vanilla and use 1 tsp cinnamon, 1/4 tsp ginger, and 1/4 tsp cloves for a Spice Cake

- Add 2 mashed bananas and 1 cup of chocolate chips for Banana-Chocolate Chip Cake

- Make a cinnamon streusel topping (I combine half a cup of flour with half a cup of sugar, 1 tsp cinnamon, and 2 Tablespoons of sunflower oil) and swirl it into the batter for a Cinnamon Coffee Cake

- Swirl cherry jam into the batter for a Cherry Cake

- Add 1/3 cup of cocoa powder to the batter to make chocolate cake. Top with chocolate frosting if you're so inclined! I sometimes just break apart a bar of chocolate and leave it to melt on the still-warm cake, then spread it around with a silicone spatula. It makes a great chocolate "icing"/

I love making this cake because it checks all my boxes: 


EASY

INEXPENSIVE

ALLERGY FRIENDLY (no dairy, eggs, or nuts!)

IT DOUBLES EASILY to make a larger cake for a crowd (use a lasagna size pan, or the largest pan of the set I mentioned above!)

YUMMY

I hope you love this cake recipe as much as I do!

Please share this post with your super busy friends who still want to cook from scratch! I know it's counter-culture but there are people out there who like to cook from scratch and take shortcuts! I can't possibly be the only one!

Thursday, September 8, 2022

Rosh Hashana Challah!


--- Retrieved from http://www.kosherfrugal.com/2013/06/sweet-whole-wheat-and-oat-bran-challah.html -

This is our Rosh Hashana challah. It's sweet and honey gives it a special flavor. This year we've noticed honey is more expensive than ever before, so I tried to modify the recipe and use a little less in order to help my kilo of honey go further. 
If you make this recipe, I'd love to hear what you think!


Whole Spelt Honey Challah

8 cups whole spelt flour, sifted (or 4 c. white + 4 c. whole)
1 cup oat bran  
1 T. salt  
2/3 cup sugar
2 tsp dry yeast
1/3 cup honey 
2-2.5 cups of lukewarm water*  
1/3 cup oil + a little more for oiling the bowl (I use sunflower oil most of the time)

Optional: 1 cup raisins (or chocolate chips for the non-traditional folk like my kids)

 *I find that the amount of water needed varies a lot - depends on the temperature and humidity in my kitchen on a particular day, and different batches of flour behave differently

Directions: 
1. Mix together dry ingredients (flour, oat bran, salt, sugar, yeast)

2. Make a well in the center of the dry ingredients and add liquid ingredients (honey, oil, water). Mix well. Then knead. 

3. Coat the dough with a little extra oil and flip over a couple of times, so the bottom and sides get oiled too. cover with a tea towel to rise till doubled. On warm days, this can be about 1 hour, but can take up to 2 hours. Sometimes I leave it longer and it's fine, since there are no eggs.
 
4. Punch down, add raisins (or chocolate chips) if you like, knead again, and shape your challot. Cover with a tea towel to rise for about 1/2 an hour. (I usually make 3 challot out of this size batch, so I often double it!) These make great "pull-apart" challot in a round pan, which I find are much less work than braided round challot, and everyone loves them. Sometimes I brush the tops with honey or sugar mixed with some hot water before baking. You can do an egg wash (or egg and sugar) on them if you prefer that they get shiny, if you're not avoiding eggs.
 
5. Bake for 25-30 min at 220C

Allow to cool before you devour them.


These got a bit dark, but they are delish.

Enjoy your Honey Challot! Shana Tovah!

Thursday, February 10, 2022

Recipe: Overnight Chicken

this post contains affiliate links. I may receive a small commission if you click on a link and make a purchase, at no additional cost to you.

This post is long, long overdue!

I've been meaning to post about one of my favorite ways to streamline my Shabbat cooking.

Some of you have heard me say that I'm getting some of the cooking out of the way on Thursday night before I go to sleep by prepping "Overnight Chicken". During really busy times, this is a lifesaver!

I know a lot of people really don't like Crock Pot Chicken, but I really love the convenience of prepping food and letting it cook while I sleep. And the thing I love about overnight chicken the way I do it is its forgiving nature. I can leave it in for 8 hours as planned, or if I need to, take it out after 10 hours! It's better than Crock Pot Chicken.

So here's what I do:

I use a nice big roasting pan. I think it's one of the keys to success with this recipe. The other key to success is the baking paper. Read on and I'll explain the method I use. If you don't have a large roasting pan like this, I recommend setting aside some money to buy one. (You can even find a very affordable one - this one ships to Israeli addresses and currently has a FREE shipping option!)

THE BASIC METHOD:
Place cut up chicken in the pan.
*Season the chicken.
Cover with baking paper.
Cover TIGHTLY with aluminum foil.
Place in oven.
Turn oven on 100 C for 8-10 hours.


After it's cooked for 8-10 hours (and most likely the aroma of your Shabbat chicken is driving everyone in the house crazy), take it out of the oven.

Take a look inside the pan:


(This was 2 chickens, cut up)

*Seasonings:

When I make overnight chicken, I default to one of two flavor profiles. And I'm completely imprecise about it. I just line up my seasonings on the counter and then one by one I shake some out onto the top of all the chicken. Obviously, this means it can vary a bit in flavor from week to week...

Flavor Profile #1: "Spicy Chicken"

For this flavor profile, I use:

Soy Sauce (I use GF soy sauce with no sugar added)
Turmeric
Granulated or Minced Garlic (lots)
Ground Ginger (not a lot)
Black Pepper (coarsely ground)
Smoked Paprika
Hot Pepper (I prefer the Chipotle version of this so it's smoked and hot - you can find it on iHerb - note that this link is my referral link)

You can leave out the soy sauce if you're soy-free, but if you do, it might be worth sprinkling a bit of salt onto the chicken with the other seasonings.

Flavor Profile #2: "Date Honey Chicken"

For this flavor profile, I use:

Granulated or Minced Garlic (don't skimp)
Ground Ginger (don't skimp)
Black Pepper (coarsely ground)
About 1/4 cup silan (Date Honey - I use the kind that is 100% dates)


I don't add salt to this one.

I'm sure you can use the same method for any other flavor profile you like -- I'd love to hear your favorites!

Hope you like this recipe. Please leave me note if you make it, and I'd be thrilled if you tag me on social media if you post about it. Thanks!